Written by Baylor Meche
In these modern times where you can get anything from a new T-Shirt to a 25 pound gummy bear delivered to your doorstep, it's easy to think everything takes just a click of a button. In comparison, getting your products printed can seem like a major hassle with several hoops to jump through and lingo you've never even seen before. At Mindzai, our team of experts always strive to deliver the best printed products and help you through this process. However, there are a few things to know that can make the print process much smoother and less stressful. Here, I'll go over the top 5 tips that will help you get your files ready to print without having to pull your hair out.
1) What the Hell is Bleed?
Whether you're getting flyers or art prints made, it's important to know that not all prints can be cut 100% accurately. If your image has any kind of color going to the edge, setting up bleed correctly can make or break how the finished product looks. Most full color files should come with three distinct lines in mind: The Bleed Line, The Cut Line, and The Safety Line.
You can think of bleed as the insurance your image will print all the way to the edge without missing any color. As a rule of thumb, there should be an extra area of 1/8 inch going around your finished piece. So if your prints are 11"x14", the file should actually be 11.25"x14.25". Rather than increasing the size of your artwork, extend the colors/background to go beyond what you want printed, forming an excess. This excess will be cut off, but you won't have to worry about any missing color on your edges.
The Trim Line refers to the actual size your prints will be cut. So using the same example as before, this is the part of your image that should measure in at 11"x14."
The Safety Line is the area where you want to keep all of your important parts of your image within. Anything within this line will be good to go without any fear of getting cut off at the Trim Line. Again, you want 1/8" from the previous line so 10.75"x13.75." Take a look at the example image below to see what these guides look like:

2) Getting your File Pixel Perfect
It's a common mistake to end up with a file that's saved at a lower resolution than you need for your prints or banners. Fast and cheap printers won't take a look at these files since they're mostly run by soulless ai robots. Even though our team consists of real humans who look at every file we get in, we can only help so much with what we're given. Sometimes after telling someone their file is too low res, the person will try to manually increase the size of their previously submitted file. This will still result in a pixelated final product no one wants to see.
Whether you're working in Photoshop, Illustrator, Procreate, or even Canva, it's always important to make sure your raster settings are at 300 PPI (Pixels Per Inch) or higher. If you didn't start at 300 PPI, it cannot be undone in a raster program like Photoshop, Procreate, etc. So it's very important to ALWAYS START AT 300 PPI for printed products.
3) Fitting into Frame
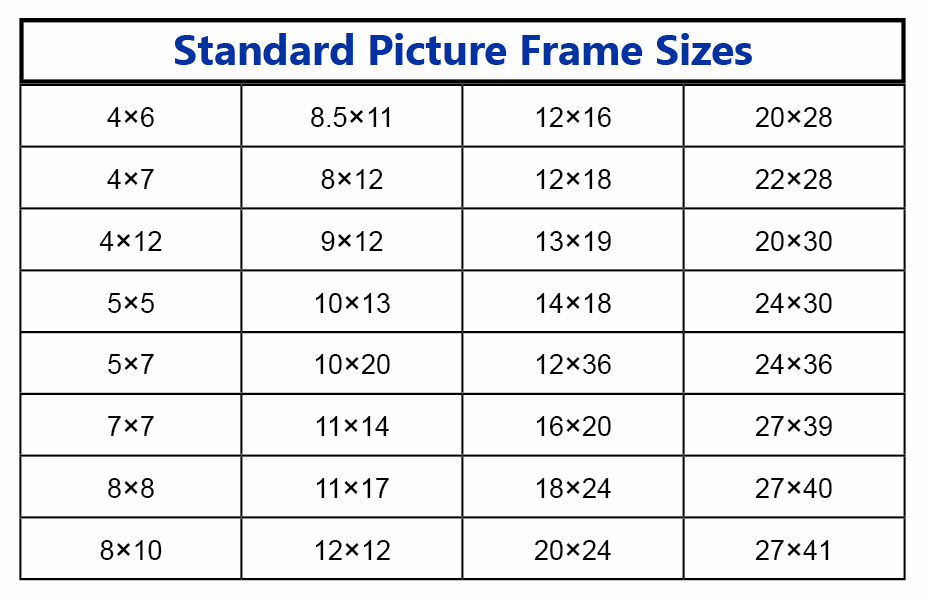
If you're in the zone painting your next creation, thinking of the finished size may seem unimportant. For the most part art can be any size you want it to be, but getting prints at unconventional sizes can deter people from buying your pieces. Even at the most affordable places, custom framing can get incredibly expensive. Someone who spends upwards of $100 on a print might be disheartened to realize it'll cost possibly even more to get it framed if the print isn't a common size.
This doesn't mean you should paint yourself into a box (no pun intended) but there are ways to tweak your prints to a size easier to frame. Once you're finished creating and you've gotten your art scanned, play around with the dimensions in your editing program of choice. Sometimes shaving off a half inch on one side or adding a simple border can put you in that sweet spot of frame sizes that your customers will really appreciate. Check out some of the most common frame sizes below.
4) One Click Can Change Your Colors
When you're saving a file on your computer to print, it's easy to just click the save button without thinking of anything else. However depending on how you save can result in a huge change in the colors of your piece. As a general rule CMYK is the optimal profile for printing, however fine art prints like giclées should be saved in an RGB profile. The type of file you save your work in is as impactful too. For digital art prints and business printing, a PDF is preferred. However TIF files are great for Fine Art.
5) Foil & UV Setup Rules
The last tip involves another common point of confusion for customers. We offer some pretty cool foil and spot UV options on business cards and other products, however setting up the files can be tricky if you're new to it. When setting up files for foil, you'll have two files: A print file and a foil file. The print file should be everything that is printed omitting the foil parts. The foil file should only have the foil bits on it with nothing else. It's important for the foil file to be in 100% K, and we highly suggest using a vector program like Adobe Illustrator for this part. The same goes for UV file prep.
Hopefully these tips will help you in setting up for print. As always you can email us with any questions about file set up. So get out there and start your next project today! Thanks for supporting Mindzai Creative and stay tuned for more blog posts newsletters.
